

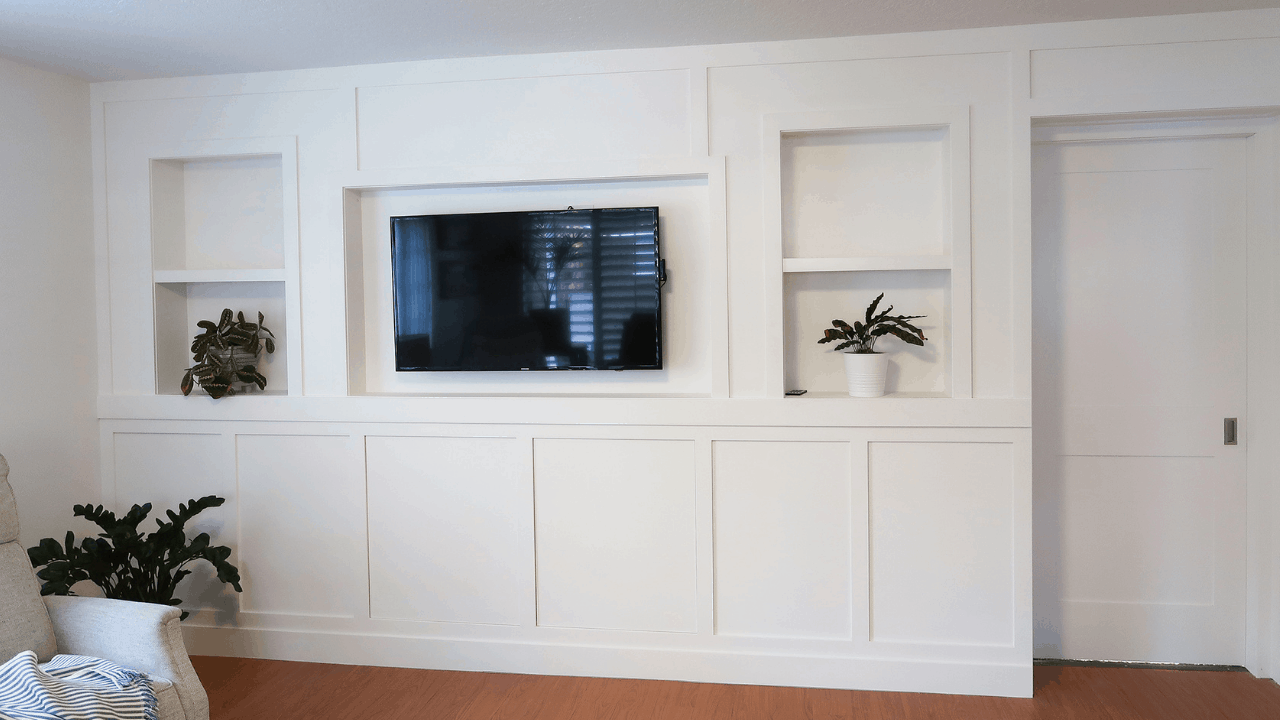
Today I am sharing our media wall DIY. After living in this home for a year we decided to transform our living room with a custom media wall.
This living room used to have a normal bedroom closet on this wall. A bedroom closet in a living room!
After some simple sketches, I decided to go with a simple design that could incorporate the TV and some shelves.
Watch Media Wall DIY Before and After

Media Wall Design
The goal was to bring some character to this wall without overdoing it.
As a family, we decided to add two shelves to either side of the television. We wanted a way to add some decor without it looking cluttered.
There was also a swinging door on this wall that leads to a hall. I wanted to keep a door there to block the noise but did not want to waste space with a swinging door.
Because of that, I included a pocket door in my design. Building the wall out 9 inches allowed me to add a pocket door and the exact amount of space for a decorative shelf.
The design was done in such a way so the TV can hang right in the middle of the wall and all of the wall details will be symmetrical and even.
There are also two hidden cabinets directly under the TV for storage.
The current TV is not very big, with that in mind I made the TV opening larger so someday we can get a bigger TV just in case we decide to.

Starting the Media Wall
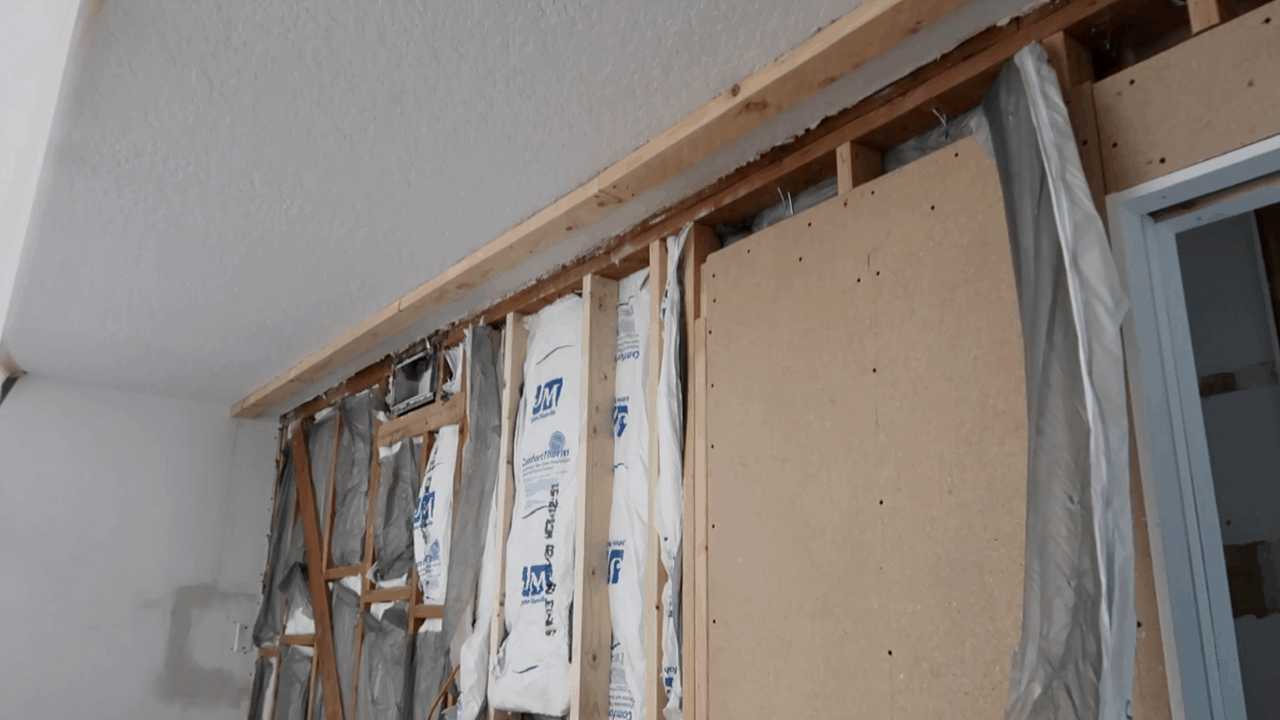
The first step was to rip out the current closet and wall. Being a finish carpenter I hate demos, but that is the obvious first step.
Before I start any project it is always a good idea to hang some plastic so everything in our home does not get covered with debris.
I ended up ripping off the entire wall because I wanted to make sure this wall was insulated really well.
There is a bedroom behind this wall so I don’t want any noise to travel to that room if possible. Once the drywall was completely demolished I insulated the whole wall with insulation.
The next step was to build and install the pocket door and get the front faux wall structure up. It’s a good idea to put in the pocket door even if you are not done with the project to make sure the doorjamb will work and is aligned right.
All you need for a pocket door is the door, a track, and the hardware. Frame the pocket door with an 8-inch wall to have enough room for some solid framing. This way it will be sturdy.
Since I was building this wall about 9 inches into our living room I decided to cut the wood floor using my track saw. This way I could get a really straight line.
Making the Decorative TV Wall
After insulating, I added some particleboard to stiffen the wall. For insulations, I used batt insulation and foam board insulation because I don’t want any noise to travel to the room behind this TV.
Under the shelves, on either side of the TV, I added a stud, but I don’t want it too tight because the shelf must be straight and not bowed.

Once all of the framing was up I added MDF Board to the framing. MDF is a Medium-density fibreboard, which is an engineered wood and is generally denser than plywood.
I am making sure all of my joins are going to be covered by where the battens are going. Battens help to add details and texture to a boring wall.
Behind where the TV is going to hang I made sure to put some extra 2×8 structure so there is something solid to hang the TV on.

Painting the Wall
I borrowed a painting rig from a friend so I could paint the wall. Because I have never painted with this rig before there were a host of problems.
In the end, I wish I had just hired someone to come and paint the wall so it could be up to my high standard.
The good news is I can always get this repainted down the road.
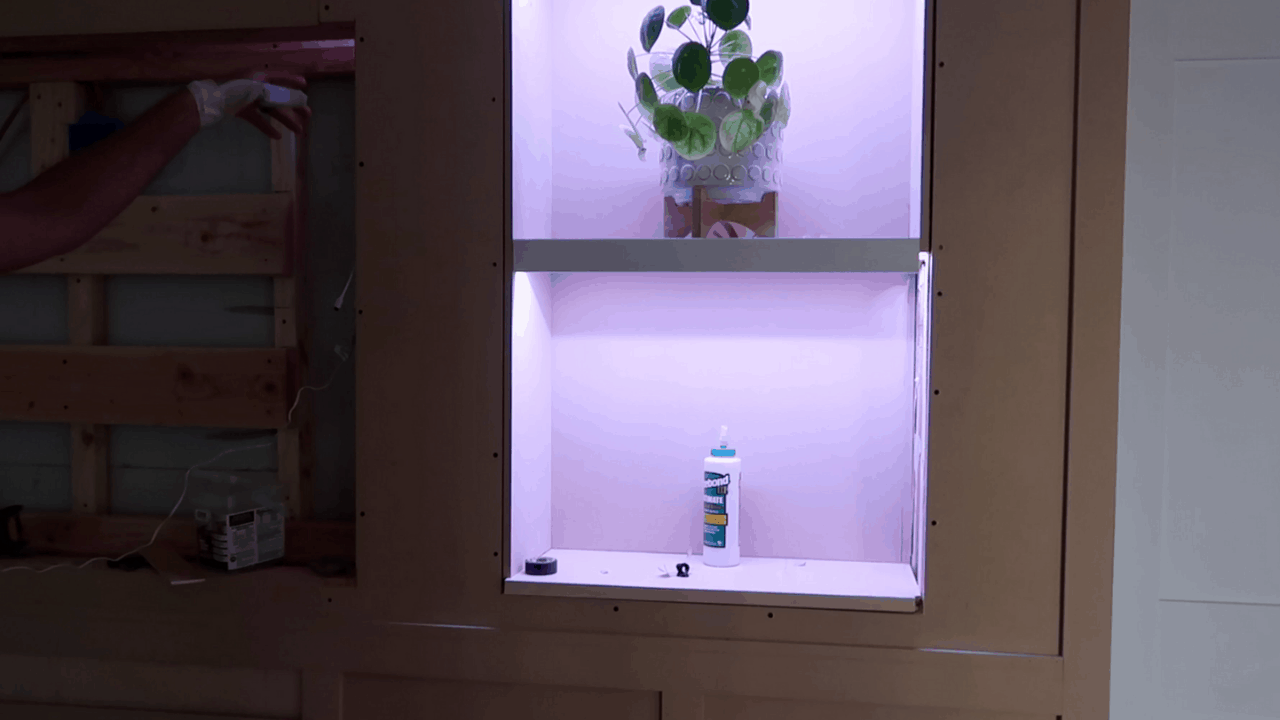
Shelf LED Lighting
Under each shelf, I added some LED lighting strips. There is a slight overhang on the shelf detail that hides this lighting. Unless it is turned on you can’t see it!
The wire goes behind the wall and plus in behind the TV.
I made sure I left the sensor out behind the TV so we could use the remote to the lights.
Conclusion: Final Media Wall
I am so happy with the way this wall turned out. This wall is a major focal point in our home and can be seen from the front door so this project was worth all the work.
Because I work in my spare time on these home projects this took about 3 months of nights and weekends to accomplish. Make sure your plastic off your work area because a LOT of dust was created.
As far as painting goes if you are a perfectionist like me, you might want to hire this out.
Supplies Used:
Pocket door
Track for Door
Insulation
Particleboard
MDF
2×8
Screws
Paint
Media Wall Before and After:
